Showing posts with label hair. Show all posts

Friday, September 14, 2012

Backpaking Hair

Yeah, this post has a ton of pictures, but to be honest, if a blog doesn't have pictures, I'm not interested. Like recipe books. The pictures are the good stuff! Anyway, my husband and I are backpacking fools--we just got back from trip to the Wind Rivers.


(I couldn't help but add this adorable one of my handsome princes) And yes, the third one down is of me looking very lovely in my hat to cover up my gross backpacking hair....which is actually how this post came to be. Don't you think everything you know about camping and backpacking would change if you could find a way to be gorgeous the whole time? Well it's possible! Meet Mallory
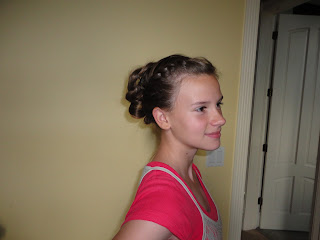
She's my little sister and she has amazingly long hair
therefore she is the perfect candidate to experiment on.
What we came up with was a super cute big-bun that keeps the hair out of your face, and works with my favorite visor.


How to Create This Do:

Step One--Bohemian Twist

The cute twist in the front is a Bohemian Twist. To create it, simple take two sections of hair at the hairline in the front of your face and twist them around each other, picking up a small section with each hand each time you twist. Do this until the hair from one half of your head is done and secure with a small, hair-matching elastic.

Step Two--Rope Braids

Secure the other half of your hair alongside your first elastic at the back of your head. These two pigtails become rope braids. Take pigtail and divide into two sections. Twist these two sections around each other until you reach the bottom and secure with an elastic. Do the same to the other pigtail.


Step Three--Bun

Wrap those babies around and pin! Don't forget to hide the ends. If your bun isn't as big as Mallory's, pull the rope braids a bit to loosen them and make big loops.


Wednesday, August 29, 2012

Mermaid Braid

I found this awesome picture on Pinterest of a "mermaid braid" and recreated it on my lovely sister's hair. This is a super cool braid that looks intricate, but is actually really simple.

How To Create This Do:

Step One--Accent Braids

Take a small section of hair from each side of your face and braid them to the middle of the back of your head and secure with a small, hair-matching elastic. (Make sure as you braid to pull the hair in the direction you want it to go or you'll get lumps when you tie them back.)

Step Two--Starting the Main Braid

Gather two small sections of hair from right under the elastic which joins the accent braids. The hair hanging in the elastic becomes your third section.

Step Three--Finishing the Main Braid

This step is super simple; you are basically doing a french braid, but each time you add in hair, only take really small pieces from your hairline, working your way down. You can either tie off after you reach the bottom of the hairline, or continue adding down to the bottom.

Step Four--Body Building!

Now take this lovely braid you've created and tug on it a little to give it some body and make it more dramatic!


Wednesday, August 15, 2012

Project Extraordinaire!

Call me crazy, but I've been dying to get this started!!! I have been following this super amazing blog My Yellow Sandbox and have caught the "obsession with new hairstyles" disease. What about doing 365 days of hair? How awesome would that be to never wear the same hairstyle all year??? So. Do you think I can do it? We're all about to find out. Ok, so I'm thinking that this might take me a while with all the pics I'll have to be taking. And what about step by step instructions and video tutorials? I'd love comments and feedback. Keep checking my 365 Days of Hair tab for updates! Maybe it's a little too confident to think that I can actually do 365 different do's, but when my neighbor Kelsey pointed out that I'm always trying new hairstyles and have something different going on, I got the boost I needed to get this project started!